Full Stack Rust
Welcome to Full Stack Rust, a series on building full stack web applications written entirely in Rust! Before we start our journey, we'll discuss a bit about what it means to be full stack, why we'd choose Rust, and what we'll build throughout this series.
At any point in time should you need a reference to the source code or material covered in a chapter, feel free to explore any of the save point branches meant to serve as a time-snapshot of the code at any point during our development workflow.
Who am I?
My name is Joey McKenzie and I'm a Software Engineer at National Funding, a San Diego-based fintech company. By day, I'm a .NET developer working across the stack. I've worked in a variety of industries with many different technologies (heck, I've even spent some time working on the AS-400!) and have developed a passion for building fast, efficient web services. I love exploring different technologies, learning new ecosystems, and most of all talking tech with like-minded folks!
As a disclaimer, I am in no way a Rust expert - I consider myself an enthusiastic hobbyist in the language and ecosystem looking to dive deeper into what is offered by the language and the great people that build it. This series is meant to serve as an exploratory exercise into full stack development offered by Rust, its advantages and tradeoffs, developer experience, etc.
For a more in-depth look into building robust web services in Rust, please refer to zero2prod created by the amazing Luca Palmieri. I give all credit to the motivation for this series to Luca, as his contribution to the Rust ecosystem has been nothing less than incredible!
What does it mean to be a "full stack" application?
In the traditional sense, a full stack web application is a single experience that attempts to deliver value to its particular domain by providing components at every level of application development. The more common components of a full stack application include, but are not limited to:
- Some form of UI delivering the presentation layer
- Core application services, providing the business logic layer
- Data access components, providing the data access layer
- Miscellaneous infrastructure components, providing cross-cutting concerns utilized by each layer
Bundled together, these components form, more or less, what is commonly referred to as a full stack application. full stack web application development can be found across many different language ecosystems (ASP.NET MVC, RoR, Django, etc.) to provide developers an experience typically driven by their language ecosystem of choice.
I'm of the opinion the term "full stack" is a bit of a misnomer for the modern developer - many of us, at some point in our careers, have worked on, or inevitably will work on, projects for organizations that require us to delve into the depths of the front and backend, profile pesky queries in our database, modifying configuration files in charge of deploying our services, etc. The point is that full stack development ties the individual pieces of software development together to form a single user experience.
Why Rust?
There are many articles, blog posts, and tech talks that highlight Rust's strengths, weaknesses, and tradeoffs from other language ecosystems authored by individuals much more qualified than me to answer that question. A quick search on the interwebs can unearth a plethora of information in regards to why we would use Rust for web application development at every level of the stack (in the most basic form). I'll defer to said authors and individuals to provide more insight into the reader's interest in an answer.
What I can say about Rust, as a primary career TypeScript/.NET developer, is that Rust provides language constructs and paradigms that those languages simply lack or have been retrofitted over the years:
- One of the most robust type systems among many popular languages
- An expansive crate ecosystem provides solutions to many common problems that arise during web application development
cargo- need I say more?
While the list could go on, I'll put it simply that Rust has been a love language I've fallen into, and find any excuse to write whenever I get the chance.
What are we building?
Throughout the series, we'll focus on building... drumroll please... a blog!
Yes, yes, I know... while a simple blog may not be the most fascinating application topic, it allows us to get our hands dirty in all of our predefined application layers:
- A UI to display our latest blog posts, as well as a form for authenticated users to create posts
- A web API to listen for requests from the frontend web app and orchestrate various business logic for CRUD operations for our users on their blog posts
- A data layer in charge of talking to our storage medium for persisting information
- Common libraries able to be consumed by any and all of our various application layers
- A robust CI/CD pipeline so we can seamlessly deploy incremental changes to our blog often
- Testing all throughout, including individual layers and between layers
- Everything is written in Rust!
Contact
If you have questions about the material, or simply want to say hi, you can contact me on my website at joeymckenzie.tech or email at joey.mckenzie27@gmail.com
Gathering requirements
Like any web application developer, we've more than likely been part of a product team at one point in time looking to deliver value in some form or another. For us and our spectacular blog, it's worthwhile to lay out a set of criteria that should act as our minimum viable product, often referred to as an MVP, to deliver to users when our work is all said and done.
With our blog, we should expect at the very minimum our users should be able to:
- Navigate to our blog website in a browser of their choice
- Expect a list of blogs upon landing on the home page
- Navigate to individual blogs selecting a blog from the presented list
- Sign up for an account
- Log in to an existing account
- Create blogs from a form once authenticated
- Edit an existing blog, given they're the original author
While not exactly a trivial list of blogging website functionality, we cover a lot of bases by providing a basic set of workflows a user can expect from our web app. Not quite exactly reaching feature parity with Facebook, but this will do for our purposes of exploring what Rust is capable of for building web applications written entirely in Rust.
I've found during my time as a seasoned software developer riddled with imposter syndrome, it's often beneficial to think like our non-technical peers when developing features in the sense of product-first engineering. With our basic use cases lined out, let's take an example from the first bullet point in the above list as a Gherkin-style feature:
As a user,
When I navigate to the home page,
I expect to be presented a list of blogs from various authors
Breaking this down, we can start to think in units of work or small batches of deliverable features that together form an user experience. While this story may be a bit vague, the gears in the head should begin turning.
When a user lands on the page, they're somehow presented with a list of blogs - okay, seems pretty straightforward. User lands on the page, we fire off a request on the frontend to fetch data from our backend service/API, the service processes the requests, talks to a database somewhere, and responds to the UI request with a (presumably JSON) serialized list of blog post data.
We're thinking in terms of _vertical slices, cross-cutting features in which the work to fulfill the specification set out by said feature requires us to touch multiple layers of our application.
As we start getting into the code, we'll take a step back at each point to analyze what needs to be done and discuss which parts of the stack we'll need to work with.
Choosing frameworks
While our choice of libraries in the Rust ecosystem is large and vast, we'll scope ourselves into a few major framework crates to help us facilitate our application logic. I'll preface this by saying I am picking libraries purely out of preference - you are more than welcome to BYOC (bring your own crates)!
Picking a UI framework
Let's start with the outermost layer of the stack, our presentation layer. There are a handful of wonderful community-driven options to build Rust web applications for the browser with the help of WASM. A quick web search presents us with options for crates to utilize, each with their own flavors of developer experience, performance, tooling, etc. There's Leptos, Sycamore, Dioxus for targeting multiple devices, etc.
Either of these projects would more than suffice for our use case, and again purely out of preference, I'll be using Yew as it is well supported, actively maintained, and heavily inspired by React - if you're coming from React or have a passing familiarity with the library, you'll feel right at home with Yew.
Our pick: Yew ✅
Picking a web framework
Onto the next, our web application framework. It may not be surprising to learn the web application framework ecosystem for Rust is quite a bit more mature than the web-based UI crates out there. Again, there is no shortage of frameworks to choose from and for our purpose of building a simple blogging engine. We'll be using axum, particularly for its community and being backed by tokio. I've written a few toy projects with axum and have thoroughly enjoyed the experience, so axum it is!
Our pick: Axum ✅
Picking a tool for database interaction
With our UI and web frameworks of choice in place, let's take a look at crates to help us orchestrate talking with a database, making queries and mutations, handling migrations, etc. Three options come to mind: Diesel, SeaORM, and sqlx. While the first two options in the preceding identify more as traditional ORM frameworks, sqlx is more aligned as a micro-ORM providing a basic set of utilities to allow us to connect to databases, perform queries against the database server, manage connections and schemas, and my favorite feature of sqlx... compile-time checks of queries!
Compile-time checks enforce correct code between our data access layer and the database system. With these checks in place, we greatly reduce the risk of unforeseen errors regarding tables or columns not existing and types not aligning. As a personal preference, I tend to leverage non-ORM tools wherever I can rather than there ORM peers so the choice for me is naturally sqlx.
Our pick: SQLx ✅
Other considerations
While Yew, Axum, and SQLx will comprise the dominate framework crates in there respective layers, we'll leverage a handful of useful libraries all throughout our project to make our job a bit easier.
Setting up our environment
Now to put our fingers on keyboard, so to speak. As our project begins to expand, we'll want to ensure a seamless developer setup experience, making the onboard process for newer devs easy and hassle free. For our local development, we'll obviously need a Rust installation and few tools to ensure we can work within the context of any project at any given time.
Dev tools
Since we'll be using yew and sqlx, we'll need two tools to help us serve compiled static content from yew and perform various database tasks with sqlx. Luckily, we can lean on a CLI for each tool in trunk and the sqlx CLI.
Trunk will be our tool of chose to work on the UI locally, build the output files required to run on a web server somewhere (more on this later), and perform various web dev things we'll need while developing the UI.
With the help of the sqlx CLI, we'll be able to run migrations and do a bit of schema caching to make sure our compile-time query checks still work even if we can't talk to our database, such as while running through CI.
To make iteration on our changes a bit faster, we'll also leverage cargo-watch so we can make incremental changes to our source code without having to restart our dev server everytime.
Workspace tools
As we begin to leverage more than a single tool/CLI during our development workflow, it would be helpful to bring a task coordinator to help us wrangle up all the various commands we'll be running to work locally, create build output bundles, lint and format our workspace, etc. This is where we'll bring in cargo-make, a cargo-based task runner based on Makefiles.
cargo-make will allow us to encapsulate all the various CLI snippets we'll run often into a single file (which we can extend, if needed), and pass off responsibility of running those commands to cargo-make itself. Not only will cargo-make help ease the obfuscation of the several different CLIs we'll be interacting with, we can also provide dependencies to individual tasks to ensure certain tasks are run before running another task that may depend on a previous command.
An example of this would be running our web app and ensuring the database server is up and running. If we were using a Docker approach (spoiler alert: we will be!), for our web app to properly spin up and be able to serve requests, we'd need the local database container to be up and running as well. With cargo-make tasks, we can define a two commands with one to run the web app dev server and one to start the database container, while adding the latter command as a dependency to run everytime we run the former command. Pretty neat!
Virtualization with dev containers
You may be wondering why we spent an entire section talking about which tools and CLIs we'll be using throughout our journey to build the world's most average blogging engine without actually installing those tools. To make our life easy, we'll tap into the power of [dev containers, fully self-contained development environments fit with all the tools we need! Thanks to dev containers, long gone are the shouts from the mountain tops that "it works on my machine."
Dev containers allow us to define a single containerized development environment bootstrapped with all the SDKs, runtimes, tools, and CLIs we'll need and create a reproducible environment for anyone new to our project to simply spin up (via Docker or GitHub Codespaces) and go.
Utilizing dev containers, we'll customize our container definition to include all the tools we need while being able to develop in a Linux-based environment similar to our production runtime environment. With this approach, we virtually eliminate the problems that can arise while developing different operating systems between local and production environments, while creating a template environment for all developers on our team/project. Say goodbye to lengthy "dev setup" READMEs that no one keeps up-to-date, and say hello to containerized dev environments.
Defining our container
So we're set on using dev containers... how do we set on up? Luckily, VS Code has us covered with a fantastic extension to help us bootstrap our containerized developer environment.
Okay, I promise we're actually going to start writing some code now. Regardless of your operating system, the only prerequisite we require as of now is a valid Docker installation on your machine. Once you've verified Docker has been installed, let's go ahead and spin up a new directory for our project.
In your favorite terminal, punch in the following:
mkdir full stack-rust && cd full stack-rust
I'll be using VS Code for our journey here, but you're more than welcome to use the editor of your choice. VS Code has great integration with dev containers, allowing us to focus more on the code than our environment. Go ahead and install the aforementioned VS Code dev container extension, and once you've opened your newly created directory in VS Code, we'll go ahead and add some dev container files to create a container definition for the context we'll be working in.
Thankfully for us, Microsoft maintains a repository of container templates for us to tap into. Since we'll be writing lots of Rust code, we need a base image that has the Rust SDK and cargo ready to roll. Hitting a ctrl + shift + p on the keyboard (or the Mac equivalent) and typing in dev containers to the search input reveals a plethora of options offered by the dev container extension.
Selecting Dev Containers: Add Dev Container Configuration Files... brings us to yet another dropdown menu, where this time we'll punch in rust to the search input. If you don't see a definition, go ahead and select the option to see all definitions, where another search of rust reveals the officially supported Rust dev container option. Go ahead and select the option (just Rust, not the Rust & Postgres option) followed by selecting the bullseye build for a slimmer container, and take a look at the generated files the extension created for us.
We should see a new folder named .devcontainer with a single file underneath it in devcontainer.json. Crack this bad boy open and take a look at the file content inside:
// For format details, see https://aka.ms/devcontainer.json. For config options, see the
// README at: https://github.com/devcontainers/templates/tree/main/src/rust
{
  "name": "Rust",
  // Or use a Dockerfile or Docker Compose file. More info: https://containers.dev/guide/dockerfile
  "image": "mcr.microsoft.com/devcontainers/rust:0-1-bullseye"

  // Features to add to the dev container. More info: https://containers.dev/features.
  // "features": {},

  // Use 'forwardPorts' to make a list of ports inside the container available locally.
  // "forwardPorts": [],

  // Use 'postCreateCommand' to run commands after the container is created.
  // "postCreateCommand": "rustc --version",

  // Configure tool-specific properties.
  // "customizations": {},

  // Uncomment to connect as root instead. More info: https://aka.ms/dev-containers-non-root.
  // "remoteUser": "root"
}
So far so good. Not too many options are pre-configured for us, and the only property we're concerned about so far is the image value. We see that it's pulling a base image from Microsoft's container registry with rust pre-configured for us. Sweet!
Running our container
Now the fun part - starting our container! To make things easy on us, the dev container extension offers options to start our container, but there's also a CLI if you're more inclined to handle container management in your terminal. At the end of the day, all we're doing is simply managing local Docker containers. Back in VS Code let's take a look at the dev container options again.
Open the options menu for the Dev Containers extension like we did before and take a look at the build options. We should see an option to build/rebuild our container - go ahead and select the option to build the container. We should have VS Code open in a new window and a message on the bottom indicating our container is being built!
Taking a look at the output log by clicking on the toast message reveals the normal Docker process of pulling base images, installing things, copying things, etc. Once it's all said and done, we should be in a new window. Crack open the terminal with a ctrl + ` (backtick) and take a look at the base path of the current directory.
Customizing our container
Great, so we've got our dev container spun up and ready to roll. Though our container is ready for us to write Rust code, we're missing the individual tools and CLIs we'll need for local development. Luckily, we can customize our container definition with a custom Dockerfile so that when our container is initially built (and rebuilt), we won't need to jump into the command line to install those tools every time we choose to rebuild our container.
Let's add a Dockerfile under our .devcontainer folder:
FROM mcr.microsoft.com/devcontainers/rust:0-1-bullseye

# Include lld linker to improve build times either by using environment variable
# RUSTFLAGS="-C link-arg=-fuse-ld=lld" or with Cargo's configuration file (i.e see .cargo/config.toml).
RUN apt-get update && export DEBIAN_FRONTEND=noninteractive \
    && apt-get -y install clang lld default-mysql-client \
    && apt-get autoremove -y \
    && apt-get clean -y

# Add trunk, sqlx, and other dependencies
RUN cargo install --locked trunk \
    && cargo install --locked cargo-make \
    && cargo install --locked sqlx-cli --no-default-features --features native-tls,mysql \
    && cargo install --locked mdbook

# Optional: if you're getting errors regarding missing wasm target, add it
RUN rustup target add wasm32-unknown-unknown
Part of this file is ripped directly from Microsoft's officially curated Dockerfiles. The tools we'll need (at least for now) will be installed on our container on every build. If another developer comes along to the team, no need to mess with the complex environment setup on their work machine!
Let's tell the dev container runner to use our Dockerfile instead of the predefined base image in our .devconatiner/devcontainer.json file:
// For format details, see https://aka.ms/devcontainer.json. For config options, see the
// README at: https://github.com/devcontainers/templates/tree/main/src/rust
{
 "name": "Full stack Rust",
 // Or use a Dockerfile or Docker Compose file. More info: https://containers.dev/guide/dockerfile
 "dockerFile": "Dockerfile",

    // Other configurations...
}
With everything in place, go ahead and rebuild your container through VS Code. After a short wait, VS Code should reload and we should be right back where we left off!
Verifying our environment
So we've spun up an entire environment ready for development, but before we do so, let's run through a quick sanity check.
Let's verify each of our tools is installed and ready to go.
First, let's verify our Rust installation. In the VS Code console (make sure you're connected to your container):
/workspaces/full stack-rust $ rustc --version && cargo --version
rustc 1.66.1 (90743e729 2023-01-10)
cargo 1.66.1 (ad779e08b 2023-01-10)
Sweet! Next, let's verify trunk and cargo-make are good to go:
/workspaces/full stack-rust $ trunk --version && cargo make --version
trunk 0.16.0
cargo-make 0.36.3
Looking good so far. Let's finally verify our sqlx version:
/workspaces/full stack-rust $ sqlx --version
sqlx-cli 0.6.2
All set, the tools we'll need (for now) are ready to go and we can start writing some code!
Defining our domain
With our dev environment in place, let's get to the fun part: building!
Behind every great data-driven web service is an even better domain model. Our domain in this case is a blog engine and all the nitty gritty detail that goes into modeling a blogging website in terms of objects in code.
As with any blogging engine, we'll end up having:
-
Blogs - each of which will have a title, content, and time of the creation
-
User profiles - each of which will consist of a username, password, time of creation, and blog posts they've authored
and lastly, for a bit of relational data spice,
- Blog comments - each of which will be associated with a blog and a user
So... what will these concepts look like in terms of code?
Starting at the most atomic layer of our stack, the database, we can see we'll need at least a few tables to house blog, comment, and user data. Pretty straightforward, we'll need to create the following tables:
-
userswith the associated properties:id- a string UUID as our primary keycreated_at- a UTC timestamp of the blog's creation dateusername- a unique limited-length text fieldpassword- a limited-length text field... that's not plain text
-
blogswith the associated properties:id- a string UUID as our primary keycreated_at- a UTC timestamp of the blog's creation datetitle- a limited-length text fieldcontent- a max-length text fieldauthor_id- a foreign key relation to theuserstableslug- a public-facing identifier generated based on the blog title
-
commentswith the associated properties:id- a string UUID as our primary keycreated_at- a UTC timestamp of the blog's creation datecontent- a limited-length text fieldauthor_id- a foreign key relation to theuserstableblog_id- a foreign key relation to theblogstable
Our schema should look roughly like the following:
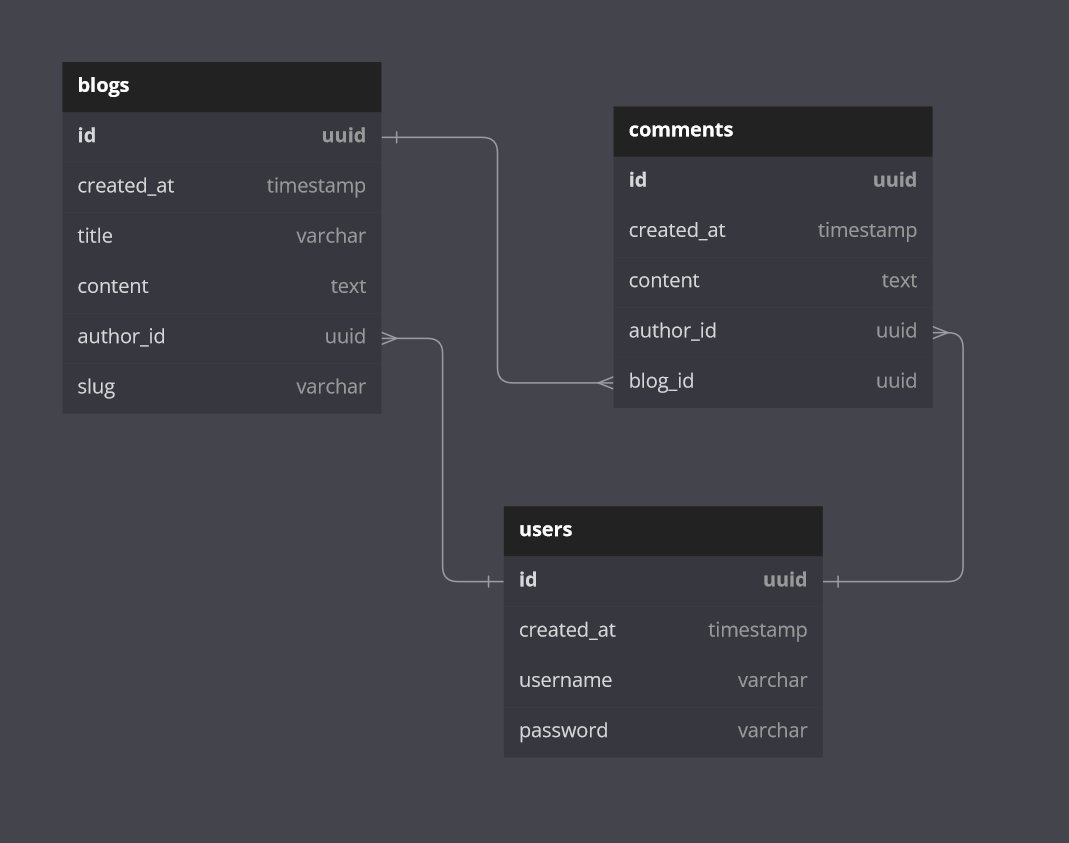
One user can have many blogs, one blog can have many comments, and one user can author many comments. We'll keep our schema simple for now, limiting ourselves to just one-to-many relationships.
Our Rust code should reflect the data we'll be working with outlined above, including structs to house data pulled out of the database in various forms and response models our UI code can consume to display on a web page.
With a good idea of how we'll store the data needed to power our blog, we should probably figure out where we'll store our data.
Thanks to the advances of modern data-based (no pun intended) SaaS platforms, we have our pick of the litter in terms of on-prem and cloud-hosted data services. As we're using Docker, we're naturally inclined to spin up yet another Docker container to host a Postgres instance for development and testing.
We'll also need someplace to put data in production, and unfortunately, a Docker-hosted Postgres instance won't suffice. To spice things up a bit, we'll use PlanetScale to manage both our development and production databases.
Setting up PlanetScale
With PlanetScale, we can manage our databases in a serverless fashion in a similar to how we manage our code. PlanetScale offers the option to develop our database like we develop our code with branches, allowing us to follow a trunk-based approach as we update, manage, and release changes to our database.
In short, PlanetScale will allow us to:
- Host a production database on our
mainbranch - Host a development/test database on our
devbranch - Make changes to our schema on our
devbranch - Merge those changes into our
mainbranch
For many of us, this is a familiar workflow when working with source code - let's do the same with our databases!
Setting up an account with PlanetScale is fairly simple. Go to the website, sign up for an account, and create your first database for free once you're directed to your dashboard.
Disclaimer: I'm not endorsed by PlanetScale, I simply love their platform and prefer it for my personal projects
Create a database, and once PlanetScale is finished setting everything up, we should be presented with a basic dashboard:
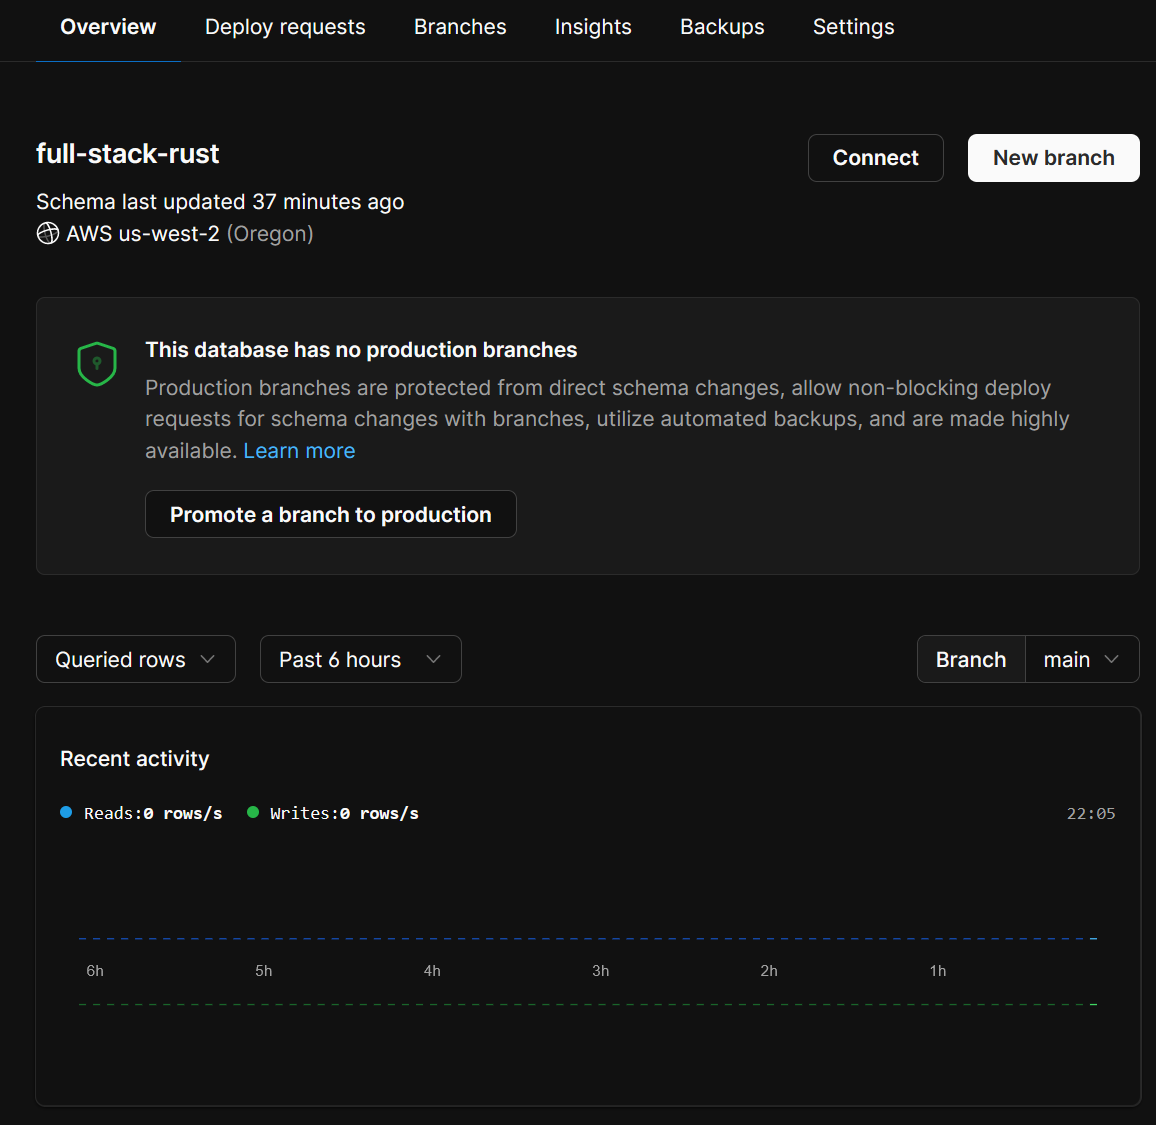
Sweet! Go ahead and grab a copy of your database's connection string by hitting the Connect button. Next, create a new branch named dev, and again, copy the credentials - these are different from the main branch!
PlanetScale doesn't allow direct schema alteration on the main branch and instead encourages us to make changes to our dev and "merge" them into our main branch database. Pretty neat, huh?
With your credentials copied into a scratch pad (that you hopefully won't forget!), let's start writing some code to set up our schema programmatically.
Scaffolding crates
Okay... finally some code. As we're developing our application, it would benefit us to split out certain layers into individual crates. Right now, we can think of the distinct layers our application will have as:
blog-web- our yew-based UI crateblog-core- the core service of our application where we'll house business logic and persistence concernsblog-api- the API layer of our application, responsible for communication between the UI and the core service cratesblog-bin- an entry point into our application, responsible for wiring everything together and executing the application
We could also benefit from a crate housing our request/response models that the UI and API will pass back and forth - this, in essence, is the heart of full stack development. Being able to leverage common types that are understood by both our frontend and backend brings many benefits while eliminating an entire class of issues that can arise when passing information via serialization. For this purpose, we'll also throw in a blog-domain crate to act as a crate to be consumed by our core crates to act as a set of contracts the consumers should be held to while communicating back and forth.
Since we're taking a multi-crate approach to developing our application code, we'll tap into the power of cargo workspaces, a cargo feature allowing us to build cargo projects (either libs or bins) in tandem while keeping concerns separate.
To create a cargo workspace, all we need is a single Cargo.toml file at the root of our folder. Let's go ahead and create one with the following content:
[workspace]
members = []
The [workspace] tags tells cargo we're in the context of a workspace with members being a string array of child crates within the workspace.
We don't have any crates so far, so let's add our core service crate so we can begin setting up our database using migrations. With sqlx migrations, we'll be able to evolve our database schema as our needs change in terms of persistence models. While we're at it, let's create a subdirectory for all of our crates to be housed for simple organziation purposes as well. Within our current workspace folder, run:
mkdir crates
cargo new --lib crates/blog-core
and update our root Cargo.toml file:
[workspace]
members = ["crates/*"]
By assigning our workspace members as crates/*, we avoid having to manually update our dependencies array and point cargo to the crates directory for all of its build specific needs. Pretty neat!
Adding migrations
With our blog-core crate in place, let's add the necessary dependencies we'll need to help facilitate our persistence logic. Since we'll be using sqlx for migrations and thanks to our dev container setup with the sqlx-cli ready to roll, we can start writing some code! Let's initialize an empty migration that we'll use to create some tables.
Since we've placed our blog-core library in a subdirectory, we'll need to run our sqlx migration commands from that subdirectory. That's a task will more than likely run multiple times, so let's lean on cargo-make to define a runnable task to add migrations while working in the root directory of our project. We've already installed the CLI as we've included it in our dev container definition, all we need now is to add a [Makefile.toml](https://github.com/JoeyMckenzie/full stack-rust/blob/main/Makefile.toml) to our repository root:
[env] ## tells cargo make that we're in the context of a Cargo workspace
CARGO_MAKE_EXTEND_WORKSPACE_MAKEFILE = true

[config] ## we want most/all of our tasks to run in the context of a workspace
default_to_workspace = false

[tasks.add-migration]
cwd = "crates/blog-core"
command = "sqlx"
args = ["migrate", "add", "${@}"]
Task runners are great tools for projects that have multiple dependencies with CLIs, various tools, etc. as they allow us to funnel all the different CLI commands we'll use through a project's lifetime into a single tool. Rather than having to memorize CLI commands for a specific tool, we can define it once with our Makefile.toml and call cargo make [some_command] to do the heavy lifting for us. Cool!
With our add-migration command, let's pass in a migration name thanks to the ${@} argument in our args array. From the root of our project:
$ cargo make add-migration add_initial_blog_tables
[cargo-make] INFO - cargo make 0.36.4
[cargo-make] INFO - Build File: Makefile.toml
[cargo-make] INFO - Task: add-migration
[cargo-make] INFO - Profile: development
[cargo-make] INFO - Running Task: legacy-migration
[cargo-make] INFO - Execute Command: "sqlx" "migrate" "add" "add_initial_blog_tables"
Creating migrations/20230202000038_add_initial_blog_tables.sql

Congratulations on creating your first migration!

Did you know you can embed your migrations in your application binary?
On startup, after creating your database connection or pool, add:

sqlx::migrate!().run(<&your_pool OR &mut your_connection>).await?;

Note that the compiler won't pick up new migrations if no Rust source files have changed.
You can create a Cargo build script to work around this with `sqlx migrate build-script`.

See: https://docs.rs/sqlx/0.5/sqlx/macro.migrate.html
[cargo-make] INFO - Build Done in 0.51 seconds.
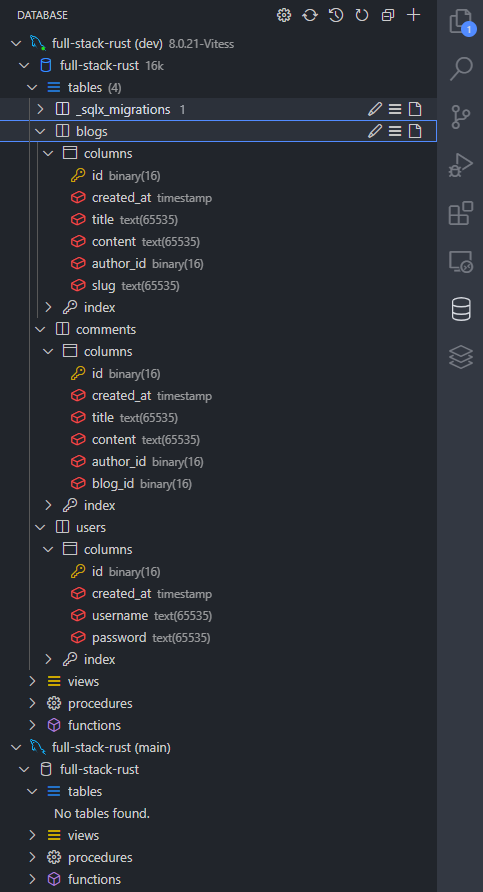
We should now see a /migrations folder in our blog-core crate with one empty SQL file (your timestamp will look a bit different than mine). Before we add the SQL to generate our tables, let's take a look at the current state of our database. Since I'm using VS Code, I'll rely on Weijan Chen's awesome database management tool so I can peek at PlanetScale from the comfort of my current editor rather than swapping between tools.
Once installed, we should the following when clicking on the database icon on our VS Code tool panel:
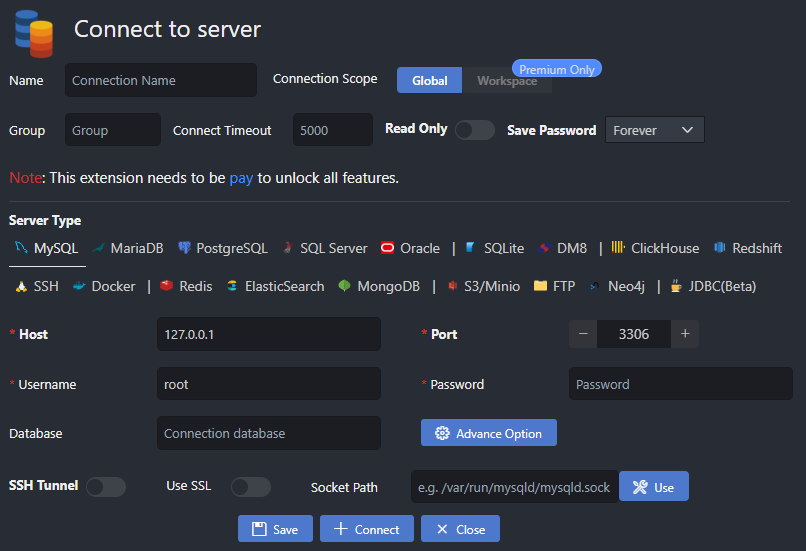
Now it's just a matter of punching in our PlanetScale credentials and connecting to the database. Hopefully, you saved your dev and main branch credentials for safekeeping as we'll extract the necessary information from the connection string to set up a database profile in VS Code. A typical MySQL connection string will look like mysql://{username}:{password}@{server}/{database} - I'll leave it up to the reader to extract the important parts and save the connection.
PlanetScale requires connection to your database over SSL, so be sure to check the option for secure connections with your SQL tool of choice
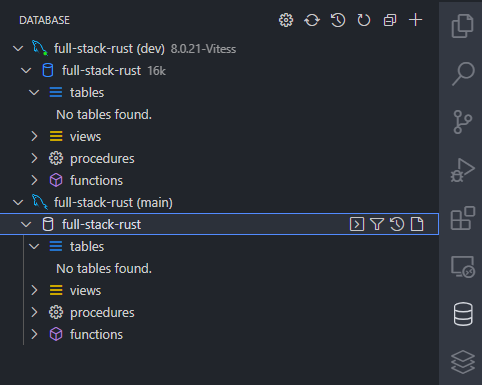
Once connected, I suggest naming your connection after the database and environment you're connected - for our case, that would look something like full stack-rust (dev). Let's add a connection to our main branch database as well while we're at it. Similar to the above, locate your connection string to the main branch and punch in the credentials. Once we've connected, our console should look something like this:
Sweet, our connections are in place and we're ready to write some SQL! Recall the schema we'll need to create initially from defining our domain - let's write the SQL to model the tables we need to create. In your migration file:
-- Add migration script here

CREATE TABLE
    users (
        id BINARY(16) PRIMARY KEY,
        created_at TIMESTAMP NOT NULL DEFAULT CURRENT_TIMESTAMP,
        username TEXT NOT NULL,
        password TEXT NOT NULL
    );

CREATE TABLE
    blogs (
        id BINARY(16) PRIMARY KEY,
        created_at TIMESTAMP NOT NULL DEFAULT CURRENT_TIMESTAMP,
        title TEXT NOT NULL,
        content TEXT NOT NULL,
        author_id BINARY(16) NOT NULL,
        slug TEXT NOT NULL,
        KEY blog_author_idx (id, author_id)
    );

CREATE TABLE
    comments (
        id BINARY(16) PRIMARY KEY,
        created_at TIMESTAMP NOT NULL DEFAULT CURRENT_TIMESTAMP,
        title TEXT NOT NULL,
        content TEXT NOT NULL,
        author_id BINARY(16) NOT NULL,
        blog_id BINARY(16) NOT NULL,
        KEY comment_author_blog_idx (id, author_id, blog_id)
    );
You may notice the lack of
FOREIGN KEYcontstraints - PlanetScale does not allow for foreign key constraints as a design choice, not necessarily out of lack of functionality. Read more here.
Before we run migrations, as we may evolve our schema over time, let's update our Makefile.toml to include a sqlx migration command:
[env] ## tells cargo make that we're in the context of a Cargo workspace
CARGO_MAKE_EXTEND_WORKSPACE_MAKEFILE = true

[config] ## we want most/all of our tasks to run in the context of a workspace
default_to_workspace = false

[tasks.add-migration]
cwd = "crates/blog-core"
command = "sqlx"
args = ["migrate", "add", "${@}"]

[tasks.migrate]
cwd = "crates/blog-core"
command = "sqlx"
args = ["migrate", "run"]
We'll need to inform sqlx of our database connection string, and have a few ways of doing this:
- Define a
.envfile at the root of our project with our PlanetScale connection string assigned to aDATABASE_URLenvironment variable - Pass in a
--database-urlflag to thesqlx migratecommand
Since we'll need sqlx to read from the connection string multiple times, let's go with option 1. Now with you .env file in place and your DATABASE_URL set to your dev branch connection string, let's run cargo make migrate in our terminal. We should see something along the lines of:
$ cargo make migrate
[cargo-make] INFO - cargo make 0.36.4
[cargo-make] INFO - Build File: Makefile.toml
[cargo-make] INFO - Task: migrate
[cargo-make] INFO - Profile: development
[cargo-make] INFO - Running Task: legacy-migration
[cargo-make] INFO - Execute Command: "sqlx" "migrate" "run"
Applied 20230202000038/migrate add initial blog tables (648.712977ms)
[cargo-make] INFO - Build Done in 2.50 seconds.
...and in our MySQL console:
We have tables! With our initial database schema in place, let's flesh out our next component in our vertical slice - the API.
Exposing API actions
We've built out a foundational database schema, now let's construct the API that our clients (a.k.a. our yew UI) will use. I like to call this shaping the API, or defining what actions a consumer can take to interact with the various endpoints we expose to the world. What should our blogging API offer in terms of acting as a headless engine for our consumers?
First and foremost, we need some way for our users to create posts - so we'll probably need some mechanism to accept POST requests to /api/blogs that expect a request to contain various details about their blog like the title and content. In that same vein, it would be nice to also allow our users to update posts, so we'll need something along the lines of PUT to /api/blogs/{{slug}}, where we'll update a blog's content given the requestor is also the owning author of the blog post.
We'll need to retrieve single posts, as well as some way to search for posts as well, maybe to display the latest posts on the home page of our UI.
We also need authentication *gasps* - nothing too complicated.
Disclaimer: authentication is wicked complicated. Don't do it yourself unless you have a great reason to, you're best suited to use some form of authentication provider like Okta or Auth0.
Our authentication portion we'll coin "poor man's" authentication, as we'll only be concerned about accepting user input with something like a username and password and validating the credentials against what we've stored for that particular user in our database.
With all that said, we can roughly sketch our API surface to look something like the following:
- GET
/api/blogs- a search endpoint for clients to hit, also allowing them to send additional filters like a limit, offset, title, and author - GET
/api/blogs/{{slug}}- a retrieval endpoint that'll return all the various bits of a particular post's data to the caller - POST
/api/blogs- a place for users to submit blog posts given they provide us with all the necessary information to do so - PUT
/api/blogs/{{slug}}- an update endpoint to allow users to modify the content of their blog, given they're the rightful owner - DELETE
/api/blogs/{{slug}}- a place for users to get rid of their content should they feel the need - POST
/api/users/registration- we'll need to allow users to sign up, so we'll offer a basic registration endpoint given they provide us a valid username and password - we don't want to allow just anyone to use our blogging engine
Testing our API
We have a rough definition of what our API surface should look like, though we don't have an actual functioning API. While putting the pieces together of what experience our API should offer up, it would benefit us to be able to test our API contracts at the edge.
At the edge testing, or simply testing our API returns the responses we expect, helps us drive what end users should anticipate calling into our various endpoints.
As a developer dealing primarily with web-based, I lean on Postman heavily to help drive the local development and testing of various web services I work on day-to-day. One feature I find helpful when think-tanking APIs with my co-workers is the response testing Postman offers.
With response testing, we can validate certain endpoints return responses as we expect, asserting various properties on the response exist and even saving bits of response data to our local environment. Let's utilize this to help drive some of the response schemas we'll expect our users to consume. In the last section, we fleshed out a rough draft of what our API surface should look like, and using Postman, we can test our endpoints to verify they return the various bits of data we should expect a client to consume.